Discover the convenience of Frigidaire’s self-cleaning oven, designed to simplify maintenance with high temperatures that turn food residue into ash, making cleaning effortless and efficient for a spotless cooking environment.
Overview of the Self-Cleaning Feature
The Frigidaire self-cleaning oven is equipped with an innovative feature that simplifies oven maintenance by using high temperatures to eliminate food residue and grime. During the self-cleaning cycle, the oven heats to a temperature exceeding normal cooking levels, converting tough spills and splatters into a fine ash that can easily be wiped away. This process is both efficient and time-saving, as it reduces the need for harsh chemicals or extensive scrubbing. The feature is designed with safety in mind, as the oven door automatically locks during the cycle to prevent accidental burns or injuries. To ensure optimal results, the oven allows users to select cleaning times ranging from 2 to 4 hours, depending on the soil level. This feature is perfect for homeowners seeking a hassle-free way to maintain their oven’s cleanliness and performance. Proper preparation, such as removing racks and utensils, is essential for a successful cleaning experience.
Benefits of Using the Self-Cleaning Oven
Using the Frigidaire self-cleaning oven offers numerous benefits that make kitchen maintenance easier and more efficient. The high-temperature cleaning cycle eliminates the need for harsh chemicals, providing a safer and more environmentally friendly alternative to traditional cleaning methods. This feature also saves time, as it handles tough food residue and grime without manual scrubbing. The automatic door lock ensures safety by preventing accidental burns during the cleaning process. Additionally, the self-cleaning function helps maintain the oven’s performance and appearance, preserving its value over time. By reducing the effort and hazard associated with manual cleaning, the self-cleaning oven is a practical solution for busy homeowners who want a spotless cooking environment without the hassle. This feature is a standout advantage for those seeking convenience and effectiveness in their kitchen appliances.

Preparing for the Self-Cleaning Cycle
Before starting, remove oven racks and utensils, ensure the oven is empty, and confirm all safety precautions are in place to avoid hazards during the high-temperature cleaning process.
Removing Oven Racks and Utensils
Before initiating the self-cleaning cycle, it is essential to remove all oven racks, pans, and utensils to prevent damage during the high-temperature cleaning process. This step ensures the oven cleans evenly and avoids any potential hazards. Gently pull out the racks and place them in a safe location for cleaning separately. Additionally, remove any food or cookware stored inside the oven; This precaution prevents items from melting or warping due to extreme heat. For racks, wash them with mild soap and water or place them in the dishwasher for a thorough clean. Once the self-cleaning cycle is complete and the oven has cooled, the racks can be reinstalled. Always refer to your Frigidaire self-cleaning oven manual for specific instructions tailored to your model.
Ensuring Safety Before Cleaning
Before starting the self-cleaning cycle, ensure all safety precautions are in place to avoid accidents. Remove all racks, pans, and utensils from the oven, as they may warp or melt during high-temperature cleaning. Close the oven door securely and ensure it is locked to prevent accidental opening. Avoid using abrasive cleaners or metal scourers, as they can damage the oven’s interior. Keep the area well-ventilated to prevent fumes from building up. Never leave the self-cleaning cycle unattended, especially if there are children or pets nearby. Additionally, do not clean the oven door gasket, as it may be damaged by heat or cleaning products. Always refer to your Frigidaire self-cleaning oven manual for model-specific safety guidelines to ensure a safe and effective cleaning process.
Activating the Self-Cleaning Cycle
Press the Self-Clean button on the control panel, select the desired cleaning time or soil level, and ensure the oven door is fully closed and locked before starting the cycle.
Step-by-Step Instructions for Starting the Cycle
To activate the self-cleaning cycle on your Frigidaire oven, start by ensuring the oven door is fully closed and the clock is set to the correct time of day. Press the Self-Clean button on the control panel until the display shows “Clean.” Next, select the desired cleaning time using the up or down arrow keys—typically 2 to 4 hours, depending on soil level. Alternatively, choose the cleaning level: light, medium, or heavy soiled. Once your selection is made, press Start to begin the cycle. The oven door will lock automatically, and the cycle will start. The oven will heat to a high temperature, turning food residue into ash. Allow the cycle to complete, then let the oven cool completely before opening the door. Once cooled, wipe away the ash with a damp cloth. Always follow the instructions in your owner’s manual for specific model details.
Selecting Cleaning Time or Soil Level
When using your Frigidaire self-cleaning oven, selecting the appropriate cleaning time or soil level is crucial for effective results. Start by assessing the oven’s interior: light soil requires a shorter cycle, while heavy buildup needs more time. Use the control panel to choose between a 2- to 4-hour cleaning time or select the soil level—light, medium, or heavy. Press the Self-Clean button, then use the arrow keys to adjust your selection. For a delay start, ensure the clock is set correctly. Once satisfied with your choice, press Start. The oven will lock and begin the cycle, using high heat to turn residue into ash. Remember, the door remains locked until the cycle completes and the oven cools. Always refer to your manual for specific guidance tailored to your model.
Post-Cleaning Procedures
After the self-cleaning cycle, allow the oven to cool completely before opening. Wipe away ash with a damp cloth and replace oven racks, ensuring a clean and safe cooking environment.
Allowing the Oven to Cool Down
After the self-cleaning cycle completes, it’s essential to let the oven cool down entirely before proceeding. This step ensures safety and prevents accidental burns or damage. The oven door will remain locked until it has cooled sufficiently, indicated by the “Lock” light turning off. Avoid opening the door prematurely, as the interior will still be extremely hot. Allow at least 1-2 hours for the oven to cool down naturally. During this time, keep the kitchen well-ventilated to eliminate any lingering odors from the cleaning process. Once the oven has cooled and the door unlocks, you can safely proceed to wipe away ashes and restore the oven racks. Patience is key to ensure a smooth and safe post-cleaning experience.
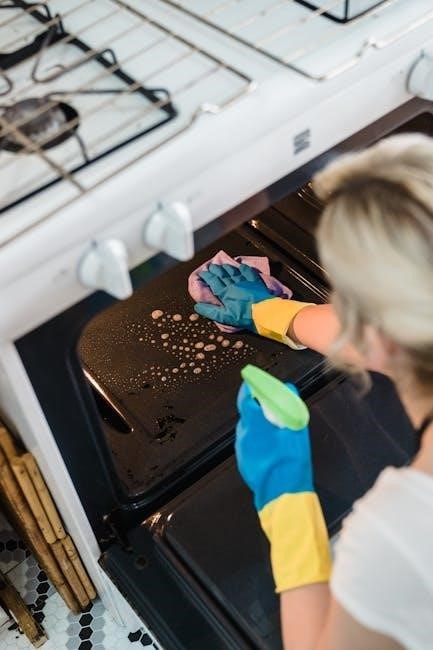
Wiping Away Ashes and Replacing Racks
Once the oven has cooled completely, it’s time to remove the ash residue left behind from the self-cleaning cycle. Use a damp cloth or sponge to gently wipe away the ashes, working from the top down to prevent them from spreading. Avoid using abrasive cleaners or scrubbers, as they may damage the oven’s finish. For tougher residue, a soft brush can be used to loosen the particles before wiping. After cleaning, dispose of the ashes properly. Finally, reinstall the oven racks and any utensils you removed earlier. Ensure they are clean and dry before placing them back to prevent water spots. Once everything is in place, your oven is ready for its next use. Regularly wiping away ashes and replacing racks helps maintain your oven’s performance and appearance.